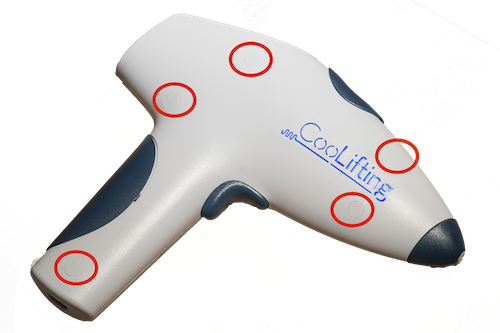
Coolifting gun battery replacement
Components needed:
-> 5 x plastic caps replacement
-> 1 x plastic blue tip replacement
-> 1 x battery
Part1 – Gun opening

- Identify the 5 caps covering the screws and remove them
- Remove the blue tip with a screwdriver
- Remove the sticker covering the buttons with help of a sharp tool
- Remove the 5 screws
- Carefully separate the two housing parts while pressing the button indicated on the image
- Gun is now opened
Part 2 – Battery replacement

- Remove the 2 screws in order to remove the injector and have easy acces to the power supply wire.
- Disconect the power supply wire. Please beware of the conector polarity
- The battery might be attached with hot glue; in order to detach the battery, proceed to heat the glue with hot air.
- Remove the battery and replace it with a new one.
- Insert the injector back with its screws.
- Reconect the power supply wire. Please beware of the conector polarity
Part 3 – Calibration

Equipment needed:
· Multimeter
· Room Thermometer
- Place the gun in its base until it is fully charged.
- Take the gun out from the base while pressing the right hand button (see picture on the left). The Language selector and Settings screen should show up on the display.
- Change the selection to “Settings” by pressing the right hand button.
- Confirm the selection by pressing the trigger.
- Screen now shows the default battery voltage preconfigured.
- Use the multimeter to measure the current battery voltage. Use the two buttons to adjust the voltage on the screen until it matches with the value measured on the voltimeter. Confirm by pressing the trigger.
- Next screen shows the default preconfigured room temperature. Use the two buttons to adjust the temperature until it matches with the value measured on the room thermometer. Confirm by pressing the trigger.
- Press the trigger on the screens that follow until you reach the home screen. At this time all the changes will be saved.
- Reassemble the gun by following Gun Opening instructions in reverse order.


